Luminal Template is equipped with fully functional and reliable contact form that allow users to send you emails with attachments, directly from your website. Configuring the contact form to send emails to your email address is easy. Simply follow the steps below.
Adding contact form to your website
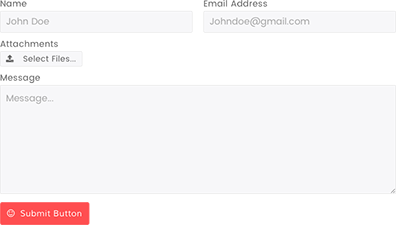
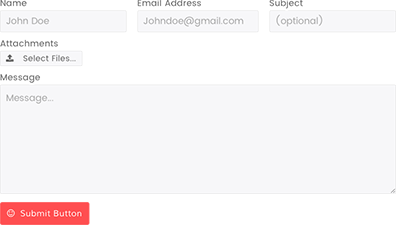
The following contact forms are fully functional. You can find them in the Forms category in Luminal SiteBuilder. The second form allows the user to enter a subject for the email. Drag and drop your desired form into your page, footer, or sidebar. Download and add the page containing one of the contact forms below to your website.
Configuring settings in 'configPrivate.php' file
We need to edit configPrivate.php file contained in the php folder of your website. Open the file in a code or text editor. The contents of the file should look similar to the code below.
$mail->isSMTP();
$mail->SMTPSecure = 'tls';
$mail->Port = 587;
$mail->SMTPDebug = 0;
$mail->SMTPAuth = true;
$mail->isHTML(false);
$mail->SetLanguage("en", "../phpmailer/language/"); // Language
$mail->Host = 'smtp.gmail.com'; // The smtp host of your email provider.
$mail->Username = 'emailaddress@example.com'; // The username of the email account that will receive the email messages. Most likely an email address.
$mail->Password = 'emailAccountPassword'; // The password of the email account that will receive the email messages.
$sendTo = 'emailreceiver@example.com'; // The email address that will receive the email messages. Must correspond with the email account used to login.
$sendToName = 'John Doe'; // Name of the person that will receive the email messages.
$input1_label = 'NAME:'; // NAME:
$input2_label = 'EMAIL ADDRESS:'; // EMAIL ADDRESS:
$input3_label = 'SUBJECT:'; // SUBJECT:
$fallbackSubject = 'New Email From:'; // NEW EMAIL FROM:
$notice_msg_sent = 'Message Sent'; // Message Sent
$err_msg_required_inputs = 'One or more required fields are empty.'; // One or more required fields are empty.
$err_msg_upload_limit = 'Cannot send message. Attachment is too large.'; // Cannot send message. Attachment is too large.
$err_msg_include_attachments = 'Failed to include attachments. Please try again.'; // Failed to include attachments. Please try again.
To get the contact form working, we may only need to edit the five blue values highlighted above. Use the guide below that shows you what each value represents and edit the values accordingly.
- $mail->Host = 'smtp.gmail.com'; - The smtp host of your email provider. Here's a list of smtp servers
. Find your email provider in the list and get the smtp host.
- $mail->Username = 'emailaddress@example.com'; - The username of the email account that will receive the email messages. Most likely the email address of your email account.
- $mail->Password = 'emailAccountPassword'; - The password of the email account that will receive the email messages.
- $sendTo = 'emailreceiver@example.com'; - The email address that will receive the email messages. Must correspond with the email account used to log in.
- $sendToName = 'John Doe'; - Name of the person that will receive the email messages.
Keep configPrivate.php file private
configPrivate.php file may now contain your email address and password. Do not share this file with anyone before removing the private information. When you publish your website and upload your files to your online web server, the contents of this file will not be visible by anyone because it's content is never sent to the users browser. Only those with access to your webhosting account and computer can open the file directly and see its content.
To test the contact form, you must place your website in a server environment such as localhost. On your website visit the page containing the contact form and try sending an email by filling and submitting the form. Once the icon stops spinning on the contact form overlay, check your email inbox for the new email, or for an alert from your email service provider. If you received an email from your email service provider regarding a blocked sing-in attempt after testing your contact form, you need to allow access to less secure apps by following the instructions provided in the email. If no new relevant email appear in your email inbox, try refreshing the page and checking your spam folder. Perform the troubleshooting steps below if you did not receive the form email, or the email from your email service provider regarding a sing-in attempt.
Allow access to less secure apps when using gmail
If your using a gmail account to receive form email, you may need to enable allow access to less secure apps
.
Troubleshoot contact form
If there are problems with your contact form, you most likely received an error in the contact form status overlay. Take the appropriate steps below depending on the error you received. Make sure you checked your email inbox for the the unrecognized account login attempt email sent by your email service provider.
- SMTP Error: Could not authenticate... - Incorrect username or password. You may need to enable Allow access to less secure apps in your Google accounts sign in & security settings
, other email services may require the same.
- SMTP connect() failed... - This error is often caused by wrong SMTP host address, or wrong port number. Make sure the SMTP address for your email provider is correct, If it is and the error persists, change the port number in your file by editing the red value highlighted in the code above. Use this list
to find the SMTP host address and the corresponding port number for your email provider.
- Parse error: syntax error, unexpected... - Syntax error means you most likely made a mistake when editing one or more values. Make sure your values are surrounded by single quotes('). This error can also occur if your password contains single quotes(') within. You will need to escape the single quotes(') by putting a backward slash before each single quote contained in your password. For example:
$mail->Password = 'Example'Password'_with'Quotes'; should become $mail->Password = 'Example\'Password\'_with\'Quotes';
If none of the above solutions worked, please contact support with a detailed description of the issue and error you encountered regarding the contact form.
Changing input values and status messages
You can change the label of each input value that appears in the email. For example the first value highlighted yellow in the code above labels what the user entered in the first input field. You can change the label along with the other yellow highlighted labels.
- $input1_label = 'NAME:'; - The first input field.
- $input2_label = 'EMAIL ADDRESS:'; - The second input field must be where the user enters the email address.
- $input3_label = 'SUBJECT:'; - If you're using the second contact form shown above, the third input field indicates the subject.
- $fallbackSubject = 'New Email From:'; - If the user does not enter a subject in the third input field, this one will be used instead.
The form overlay fades in when the form is submitted and shows the status of the form. The values highlighted green are the messages that are shown when something particular happens, feel free to rephrase the status messages.
Improving website load speed
Methods to improve loading performance of your Luminal website are the same when improving performance for any other website. Below are links to tutorials and tools that can help improve your website loading performance by optimizing images, leveraging browser cache, and using gZip compression.
Luminal Template is automatically responsive. This means your website will adjust itself based on the screen size with little to no additional efforts required from you. It's what makes your website fit on smaller screen sizes like tablets and smartphones. Luminal SiteBuilder gives you the freedom to place almost any element in any container. However this does not mean that putting a large element in a small container will work well on smaller screen sizes. While Luminal Template is fully responsive, there is still a breaking point where the pages you create might overflow on mobile devices or look constrained if you do not take this into consideration.
Create the pages and layouts you envisioned, but keep in mind that some elements were not designed to be placed in small containers. However most elements do work well on both large and small containers. Ultimately; it's up to you to build, test, and decide what looks good and what doesn't.
Testing responsive design
The best way to create a responsive-compatible website is by first building the pages you want with the Luminal SiteBuilder, testing how those pages behave on smaller screens, and adjusting the elements to improve the responsive appearance if necessary.
- Assuming you're using Google Chrome browser, right click on the page you want to test and click inspect to open developer tools.
- Open device toolbar by clicking the toggle device toolbar button in developer tools.
- You can use device toolbar to shrink the viewport of your website and see how layouts change as you resize.
Improving responsive design
Improve the responsive design of your website by finding a compromise between the layout you want, and the layout that works well on small screen sizes. If you encounter a section that looks well on desktop resolutions, but not on mobile resolutions; use the Luminal SiteBuilder to modify and re-arrange the elements in a way that improves appearance on mobile resolutions.
Include your CSS and JS code in seperate custom.css & custom.js files
When you want to update Luminal to the latest version, you would need to replace the corresponding files in your website. This means that any code you add to the CSS, JavaScript, or PHP files will be removed if its replaced. Therefore your code should go in separate files that contain your custom CSS or JavaScript code. This makes it easier to update Luminal Template to the latest version, while keeping your modifications intact. It's also a good idea to add prefixes to any classes and id's you create so they don't interfere with existing classes and id's.
For the reasons described above, your CSS code should go in a separate CSS file named custom.css contained in the CSS folder. But first follow the steps below to properly include the custom.css file
- To include the custom.css file in the current and future pages you edit with Luminal SiteBuilder, import to Luminal SiteBuilder all your pages .lsb files you want to load custom.css into.
- Click Header & General Options in the Luminal SiteBuilder sidebar and scroll down to Toggle Options
- Find include custom.css file switch and enable it. Then export and add all the pages to your website
- The file is now included in your website. You can begin adding your CSS code in the custom.css file.
There are a few things you should keep in mind when adding HTML code to your Luminal website.
- Classes and ID's you create should have prefixes to avoid conflict with existing classes and id's in Luminal Template
- When you edit/add HTML to your .html page files; the changes will not be applied to the corresponding .lsb file and so those changes will be removed if you later decide to edit that same page by importing the .lsb file to Luminal SiteBuilder, exporting and replacing the .html page file you made custom changes to. It's recommended you build and edit your pages with Luminal SiteBuilder as much as possible.
- Styles for you custom HTML code should go in the customs.css file.
Your JavaScript code should go in the custom.js file contained in the js folder. This makes it easier to update Luminal Template in the future. To properly include the custom.js file into your website, follow the steps below.
- Import to Luminal SiteBuilder the pages .lsb files you want custom.js to be loaded into.
- Click Header & General Options in the Luminal SiteBuilder sidebar while in header builder mode and scroll down to Toggle Options.
- Find include custom.js file switch and enable it. Then export the page files and add them to your website folder.
- The custom.js file is now included in your pages. You can add your JavaScript code in the custom.js file.
Initiating instance when page is loaded when using AJAX
customJSDocReadyPageLoad() function Is triggered when the document is ready and when a page has been loaded with AJAX. You can use this function to check for elements in the DOM. For example we can look for and initialize a jQuery UI Tabs widget when the document is ready, and when a new page has been loaded with AJAX.
function customJSDocReadyPageLoad() {

   $(document).find(".my-tabs-widget:not(.ui-tabs)").each(function() {
      $(this).tabs();
   });

}
Destroying instance before page unloads when using AJAX
When a page containing your custom element is unloaded with AJAX, it's a good idea to destroy the element instance beforehand. The function customJSPageUnload function lets you interact with elements before their removed. For example we can destroy the custom jQuery UI Tabs widget before it's removed from the DOM.
function customJSPageUnload(gcRemovedElementsArea) {

   gcRemovedElementsArea.find(".my-tabs-widget.ui-tabs").tabs("destroy");

}
gcRemovedElementsArea is the page container element holding all the page content that will be removed. You can find your custom element within the container and destroy its instance before its removed.
Clearing intervals before page unloads when using AJAX
If you're using window.setInterval() to repeatedly trigger code that interacts with a DOM element within your page, you will need to store your setInterval method in a variable, and push the variable along with the element it interacts with to the pageIntervals array. For example if we want to make a jQuery UI Tabs widget switch to the next tab every 5 seconds, we do the following:
function customJSDocReadyPageLoad() {
$(document).find(".my-tabs-widget").each(function() {
var $thisTabsWidget = $(this);
$thisTabsWidget.tabs();
var mySetInterval = window.setInterval(function() {
var activeTab = $thisTabsWidget.tabs("option", "active");
$thisTabsWidget.tabs("option", "active", activeTab + 1);
}, 5000);
pageIntervals.push({id:mySetInterval, elem:$thisTabsWidget});
});
}
When the page is unloaded with AJAX, the tabs element will be removed from the DOM, but the setInterval will remain. And because the tabs widget no longer exists, an error will be triggered every 5 seconds unless we clear the setInterval after the page unloads and the tabs widget is removed.
We need to push the interval id held by mySetInterval variable, and the element it interacts with to the global pageIntervals array. The intervalsGarbageCollector() function in elements.js goes over each item in the pageIntervals array and checks if the matching element exists in the DOM, if it doesn't; the associated interval is cleared when the user switches page with AJAX and the element is removed.